
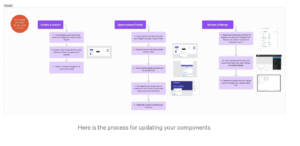
These are the steps:
- Focus & Branch
- Test & Swap
- Merge & Enjoy
Also, keep in mind that you will need the following:
- Ability to branch
- Instant Finder plugin
- Outdated Figma library
1. Focus & Branch
First things first, open your Figma library and try not to faint when you see all the outdated components that are screaming to be updated with all the new features Figma introduces from time to time.
Then, make a list of the components in your library and prioritize them. The idea here is to gather your team and do this exercise in a call: Which components are used frequently? Which ones are most often shared between different projects? Which ones are the easiest? The most difficult? etc.
After you have everything in place with your team:
- Create a branch in your catastrophic Figma library and name it Figma Update: Buttons, for example, so the team knows which component in that branch will receive an update. (Click the drop-down arrow next to the Figma Library name and select “Create Branch.”)
- Within that branch, update only that component, one at a time. (Be sure you add micro interactions, component properties, autolayouts, etc)
- Send the branch for review, if you have other designers to help you review, if not, make sure everything is ok and merge it to the library once again (Click the drop-down arrow next to the name of your Figma File, select “Review and merge changes”)
- Lastly, publish the changes to the library
Tip: Doing this in a branch makes it easier to see the changes in the file history, and also creates a test environment where you can safely make these changes without changing the main file.
2. Test & Swap
Now let us test this in our Figma project file! We need to be careful here, but it’s basically the same process, a lot of branches and safe environments.
- Create a branch in your Figma project file (Click the drop-down arrow next to the name of your Figma File, and select “Create branch”)
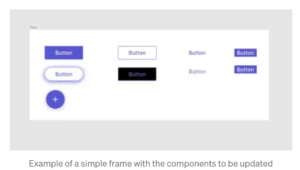
- Make a test frame with the component that should receive an update in the branch (As you can see, we have not agreed to receive the updates from the Figma library)
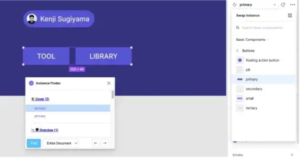
- Open the “Instant Finder” (Click on the instant in the frame and then click “Find”)
- Update the library changes in the branch you created.
- Go through the results and make sure the updates work! 🙂
Tip: It may be that the component has not been updated. Click on the component and on the Design tab, click on the component name again so that the component is updated with the changes.
3. Merge & Enjoy
Finally, merge the branch.
- In the branch, be sure all instances work with the updates, such as Component Properties, the new organization, microinteractions, and so on.
- Send the branch for review (Yes, the same process, or merge it right away, depending on how you worked with your designer colleagues)
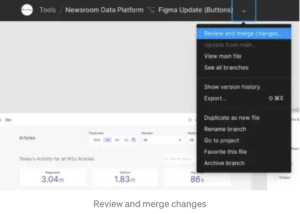
- You can see all the changes with different labels in the “Branch review” window, when you’re ready, click “Merge branch”
- Have fun! (Or at least try to)
Some tips
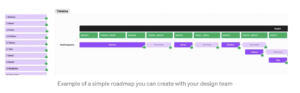
- Try to make a roadmap with your fellow designers, maybe they can help you with the capacity and other components, and share the load.
- Update one component at a time. If you update multiple components at the same time, this will cause confusion within the files and your stakeholders.
- Get help! If your team can assign one designer to be the “Gatekeeper” that would be awesome. (This designer is the one who reviews and accepts all the changes and provides suggestions for improvements as needed)
Conclusion
This is a process that requires a lot of patience. Remember that updating your library is full of concerns from all your stakeholders that interact with the Figma library every time, so take time doing it correctly, steady and focused.
That’s it, enjoy your fresh brand new Figma library!