Deploying Lambdas with AWS SAM & GitHub Actions
As a web developer with over 13 years of experience, I’ve witnessed the incredible evolution in code delivery. Nowadays, I embrace continuous integration/continuous delivery (CI/CD) pipelines in the cloud, which become invaluable when working in complex applications.
This method allows for faster and more frequent releases, automating the deployment process and minimizing human errors while ensuring consistency across different environments, from development and QA to production.
In this post, I’ll walk you through how to create a lambda to handle GET requests and an authorizer lambda to validate JWT and control API access, both under the same API Gateway. We’ll finish strong by configuring GitHub Actions to effortlessly deploy our lambdas to AWS.
Prerequisites
Before diving in, please ensure that you meet the following requirements:
- An active AWS account with administrative IAM user access.
- AWS CLI installed on your machine.
- Configured AWS credentials for seamless interaction with AWS services.
- AWS SAM CLI installed to facilitate serverless application development.
- A GitHub repository to store your code.
- A local development environment that is already set up. In this guide, we’ll be using Go.
- Docker installed on your machine for local testing purposes.
If you’re starting from scratch and need assistance with the initial setup, you can refer to the Getting Started with AWS SAM guide in the AWS documentation.
Creating Your Lambdas
We’ll be using SAM (Serverless Application Model) — an open-source framework designed for building serverless applications on AWS — to create all of our resources.
SAM offers a range of templates tailored for common use cases, and with the help of SAM CLI, creating a lambda function is very easy. You can start by using the “hello world” example and modify it according to your requirements.
Let’s get started. Open your terminal and run sam init to launch the assistant.
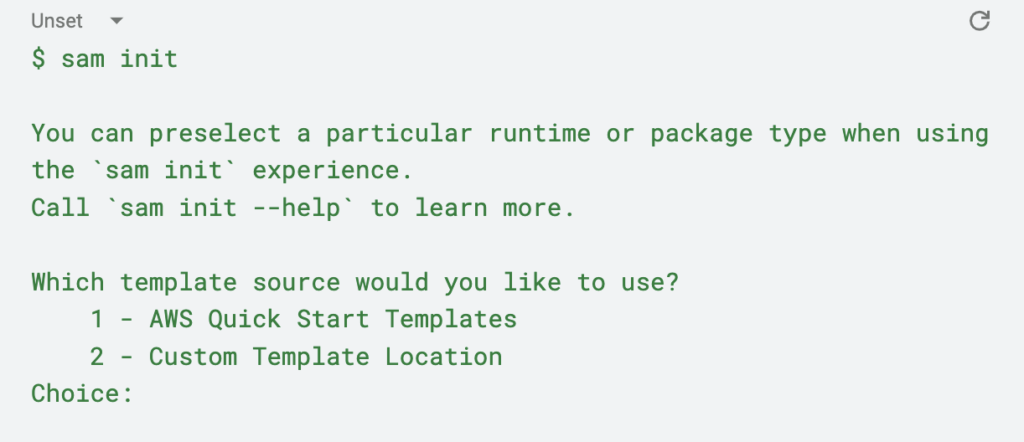
You’ll be presented with two options. Choose option 1. Next, a list of templates will appear, and once again, choose option 1 (Hello World Example).
Now, it’s time to select your runtime. For this guide, I’ll select go1.x. As for the package type, let’s choose zip.
The assistant will prompt you with a question about enabling X-Ray tracing and CloudWatch Application Insight for the function. Answer y to enable both.
Lastly, when asked for the name of your application, provide a suitable name. In my case, I’ll name it hello-lambda.
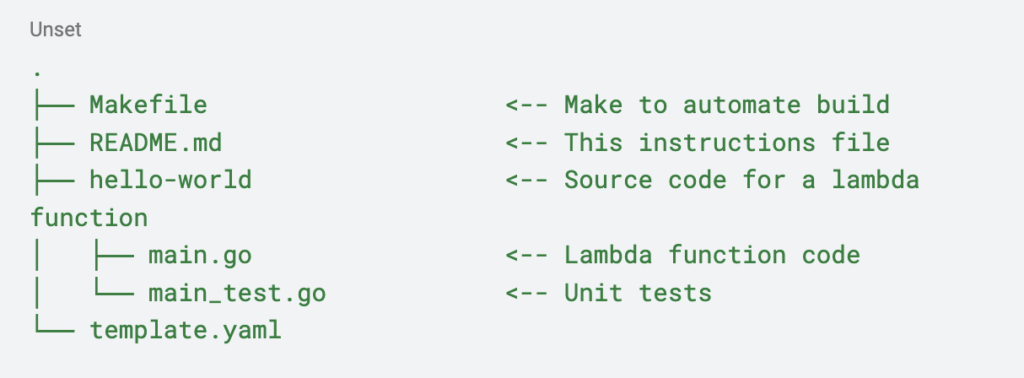
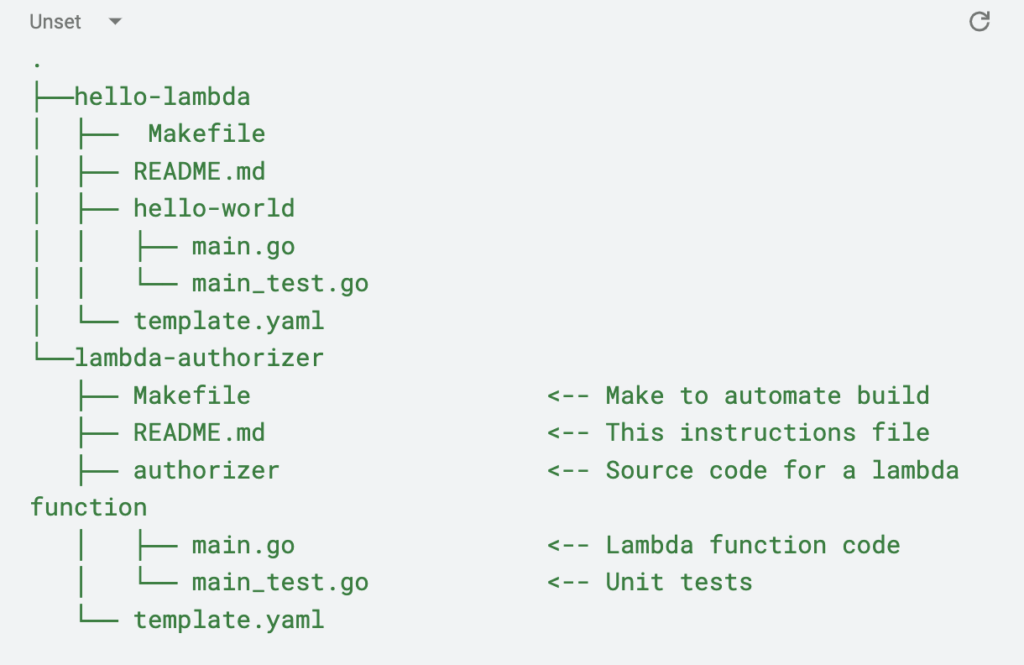
SAM will create a new folder called hello-lambda with the following structure:
Now, you can begin by renaming the hello-world references with the desired name for your lambda or project, then add the functionality you need. For the sake of simplicity, I’ll leave this lambda as is.
Next, repeat the same process to create the foundation for a lambda authorizer. I named my lambda lambda-authorizer and updated the folder and references from hello-world to authorizer.
Your folder structure should look something like this:
Note : Make sure to update the Go version in the lambdas’ go.mod files to ensure compatibility with the SAM tooling. It is recommended to use at least Go 1.18 (I’m using 1.20).
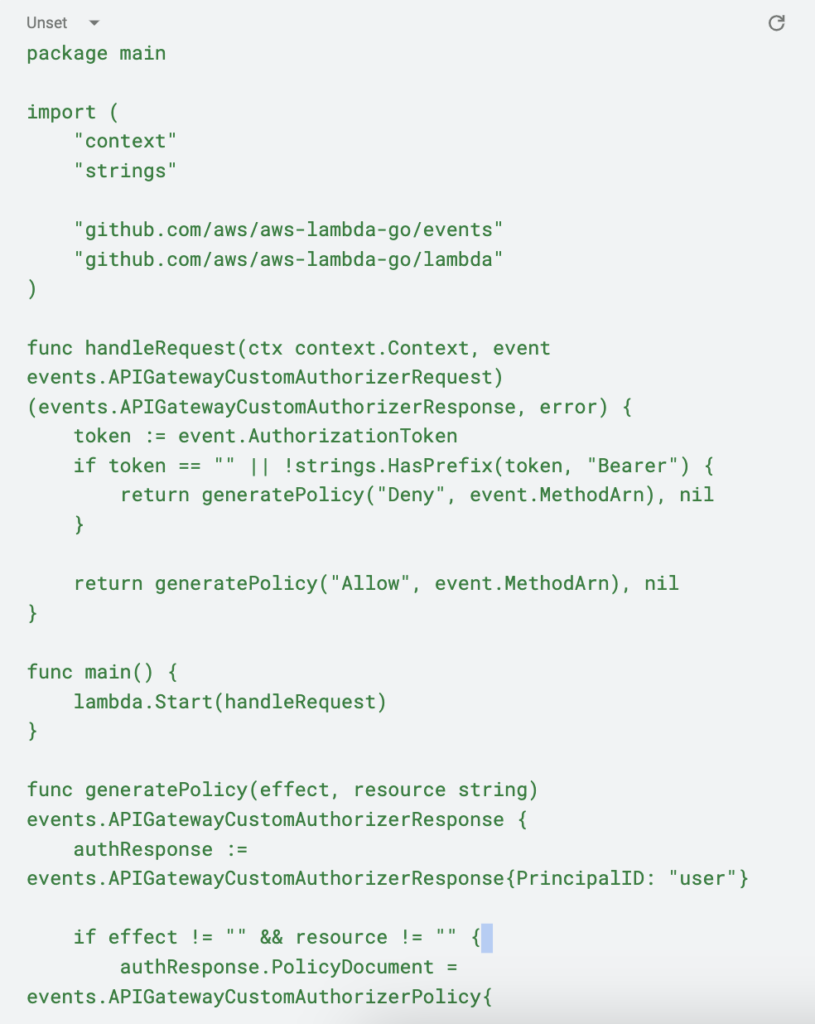
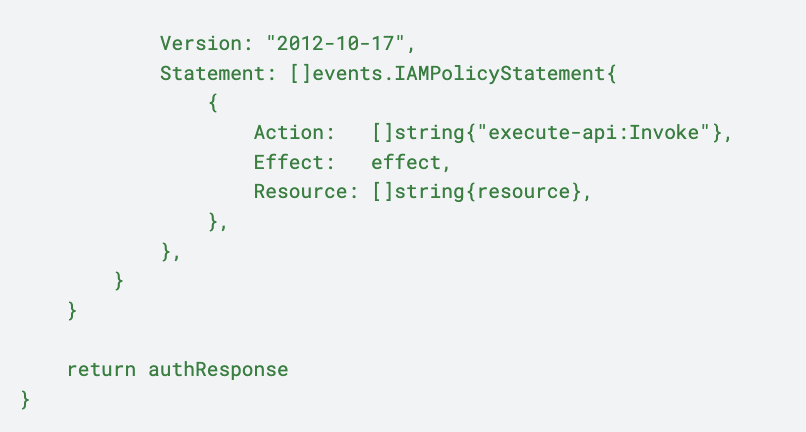
The code for the authorizer is quite straightforward. Currently, it simply validates the presence of a Bearer token in the Authorization header. An authorizer lambda must return an APIGatewayCustomAuthorizerResponse with either an Allow or Deny IAM policy.
Here is the complete code for the authorizer. Feel free to add any additional validation logic you require within the handleRequest method:
Building and Packaging Lambdas with SAM
We have our lambdas ready, and technically, we can use the SAM command sam deploy to deploy each lambda individually to AWS. However, before doing that, we need to:
- Deploy our lambdas as part of the same API Gateway.
- Create the necessary roles for SAM to create resources and enable interaction between our resources.
- Deploy everything with a single command.
To achieve this, let’s create a new template.yaml file in the root folder, at the same level as hello-lambda and lambda-authorizer.
In this file, we’ll define a few important components:
- The API Gateway where our lambdas will be accessible.
- A role that grants permissions to our lambdas to write to CloudWatch.
- The build method for our lambdas.
To save time, let’s copy the contents of the template.yaml file from hello-lambda and start adding our additional resources.
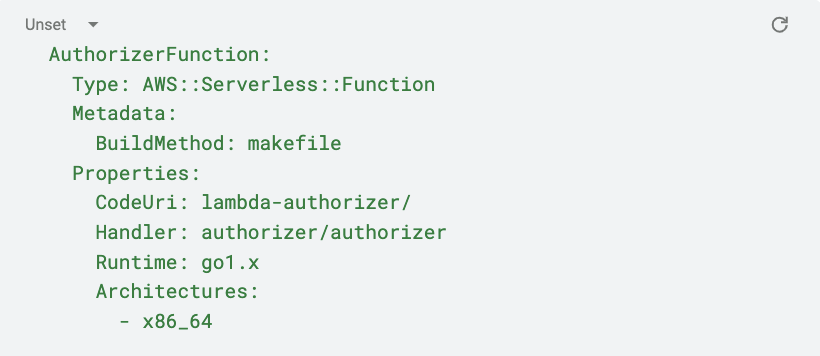
First, let’s add the resource definition for the authorizer lambda. Note that it will have the same definition as the one in lambda-authorizer/template.yaml, but without the Events section.
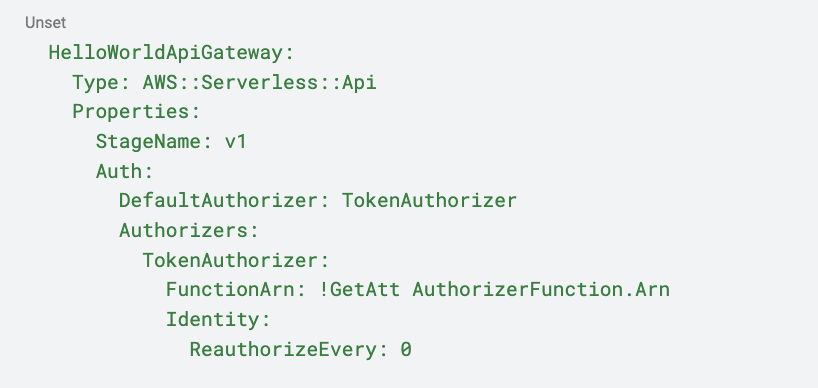
Then, we will define our API Gateway and specify the authorizer function:
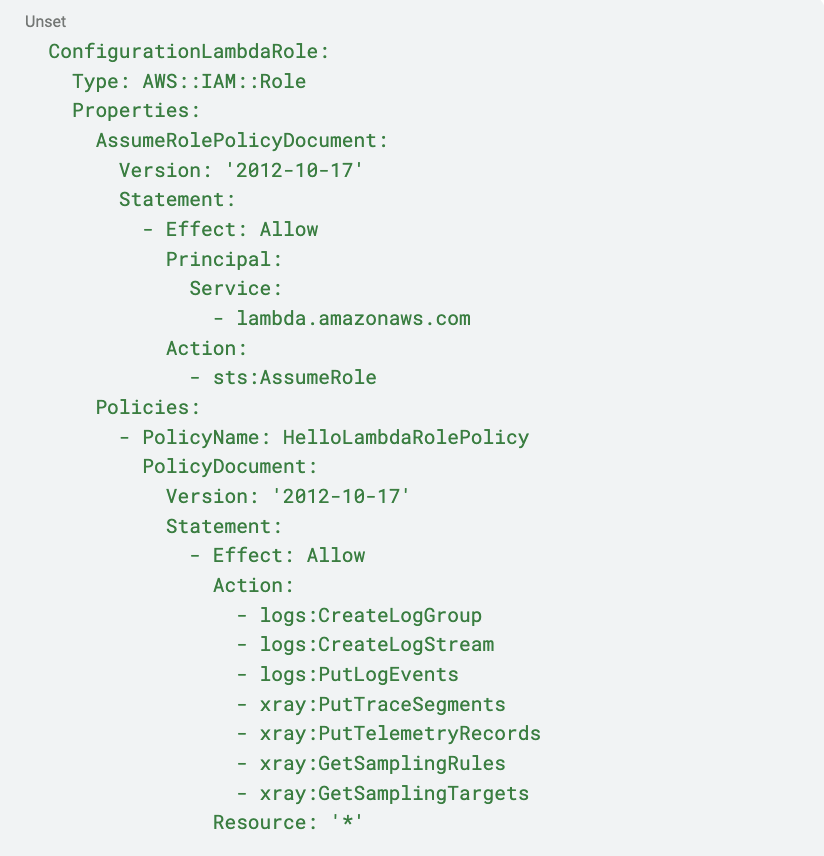
Next, let’s add another resource. This resource will define the role our lambda will assume to be able to write to CloudWatch and send traces to X-Ray
Then, we are going back to the definition of our HelloWorldFunction to add the role to assume. This is the final resource definition:
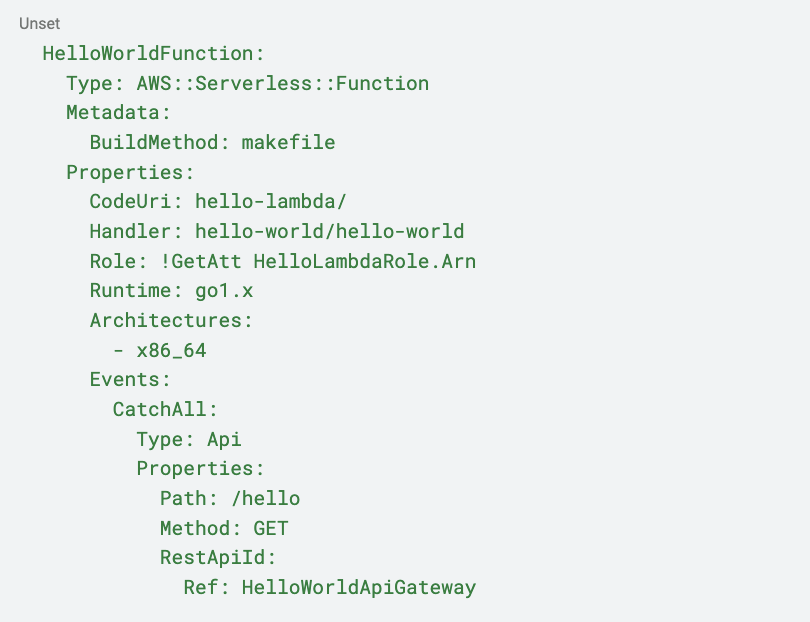
Note that we removed the Environment section, as we don’t need it, but you can use this section to pass Env Var values to your lambda code. The values for CodeUri and Handler have also changed. The new values follow the pattern:

We also added a new property, Metadata. This is used to specify a custom build command when compiling the lambda. However, we need to go to each of our lambda’s Makefiles and add the following:
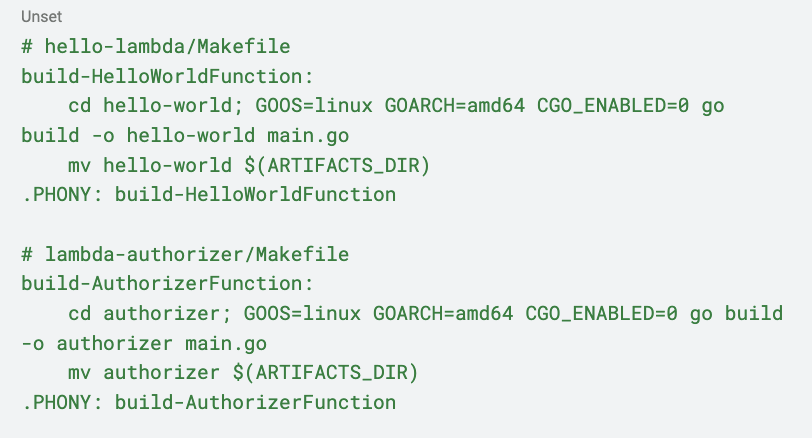
What’s happening here? Let’s take hello-lambda as an example:
- The Makefile is located at the root level of the hello-lambda folder. So, we need to change the directory to hello-lambda, which is the folder containing our go.mod file.
- We set some flags for building the project:
- GOOS=linux: This flag sets the target operating system to Linux.
- GOARCH=amd64: This flag indicates that the resulting binary is optimized for 64-bit systems, specifically x86_64 processors.
- CGO_ENABLED=0: This flag is commonly used when you want to create a pure Go binary without relying on external C libraries. It makes your Go application more easily compiled and executed on different platforms without worrying about compatibility issues with C libraries.
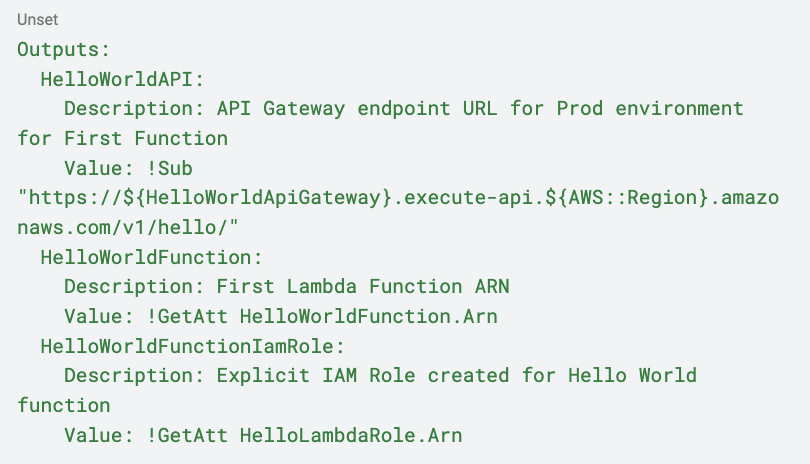
The last change to make in our global template.yaml file is to update the outputs to reference the API Gateway we just defined and the role we are creating:
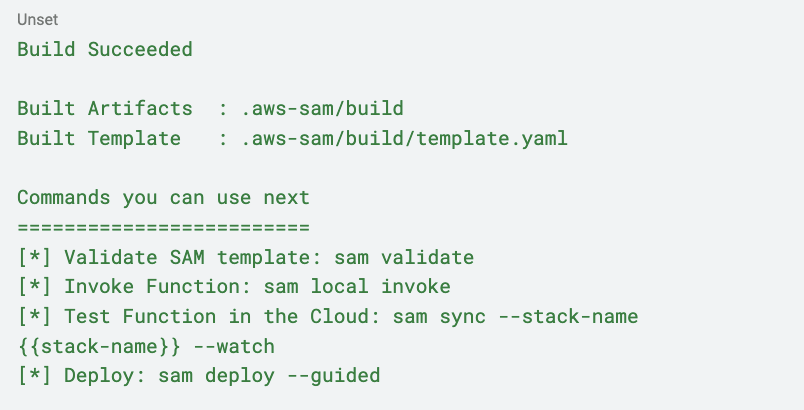
You can view the final and complete template.yml file here. Now, we can start checking if everything works as expected. In your terminal, change directories to the project root and run:

If everything is correct, you should see something like:
At this point, we should be able to deploy our lambdas using SAM CLI. You can do so by running:

An assistant will ask you for some information about your project and your AWS account, such as the name to give the stack, the region for deployment, and if you need to review changes before applying. Once you provide the required details, you should be good to go! However, we don’t want to manually deploy our lambdas. Let’s see how we can set up a GitHub workflow and leverage some cool features of SAM.
After building our project and ensuring everything is in order, it’s a good time to run:

This command will initiate an interactive assistant that guides you through creating the necessary AWS infrastructure resources for SAM to deploy your code. During the process, you will be prompted to select a user permissions provider. Choose OpenID Connect (OIDC), which will create a role for the GitHub workflow to deploy our project and monitor the creation process.
The assistant will also assist you in setting up a multi-stage deployment. It will ask you which branches should be pushed to the Dev environment (usually dev or development) and which branch should be deployed to the Production environment (usually main branch).
Once you complete the questionnaire, the bootstrapping process will begin. When it finishes, you’ll have:
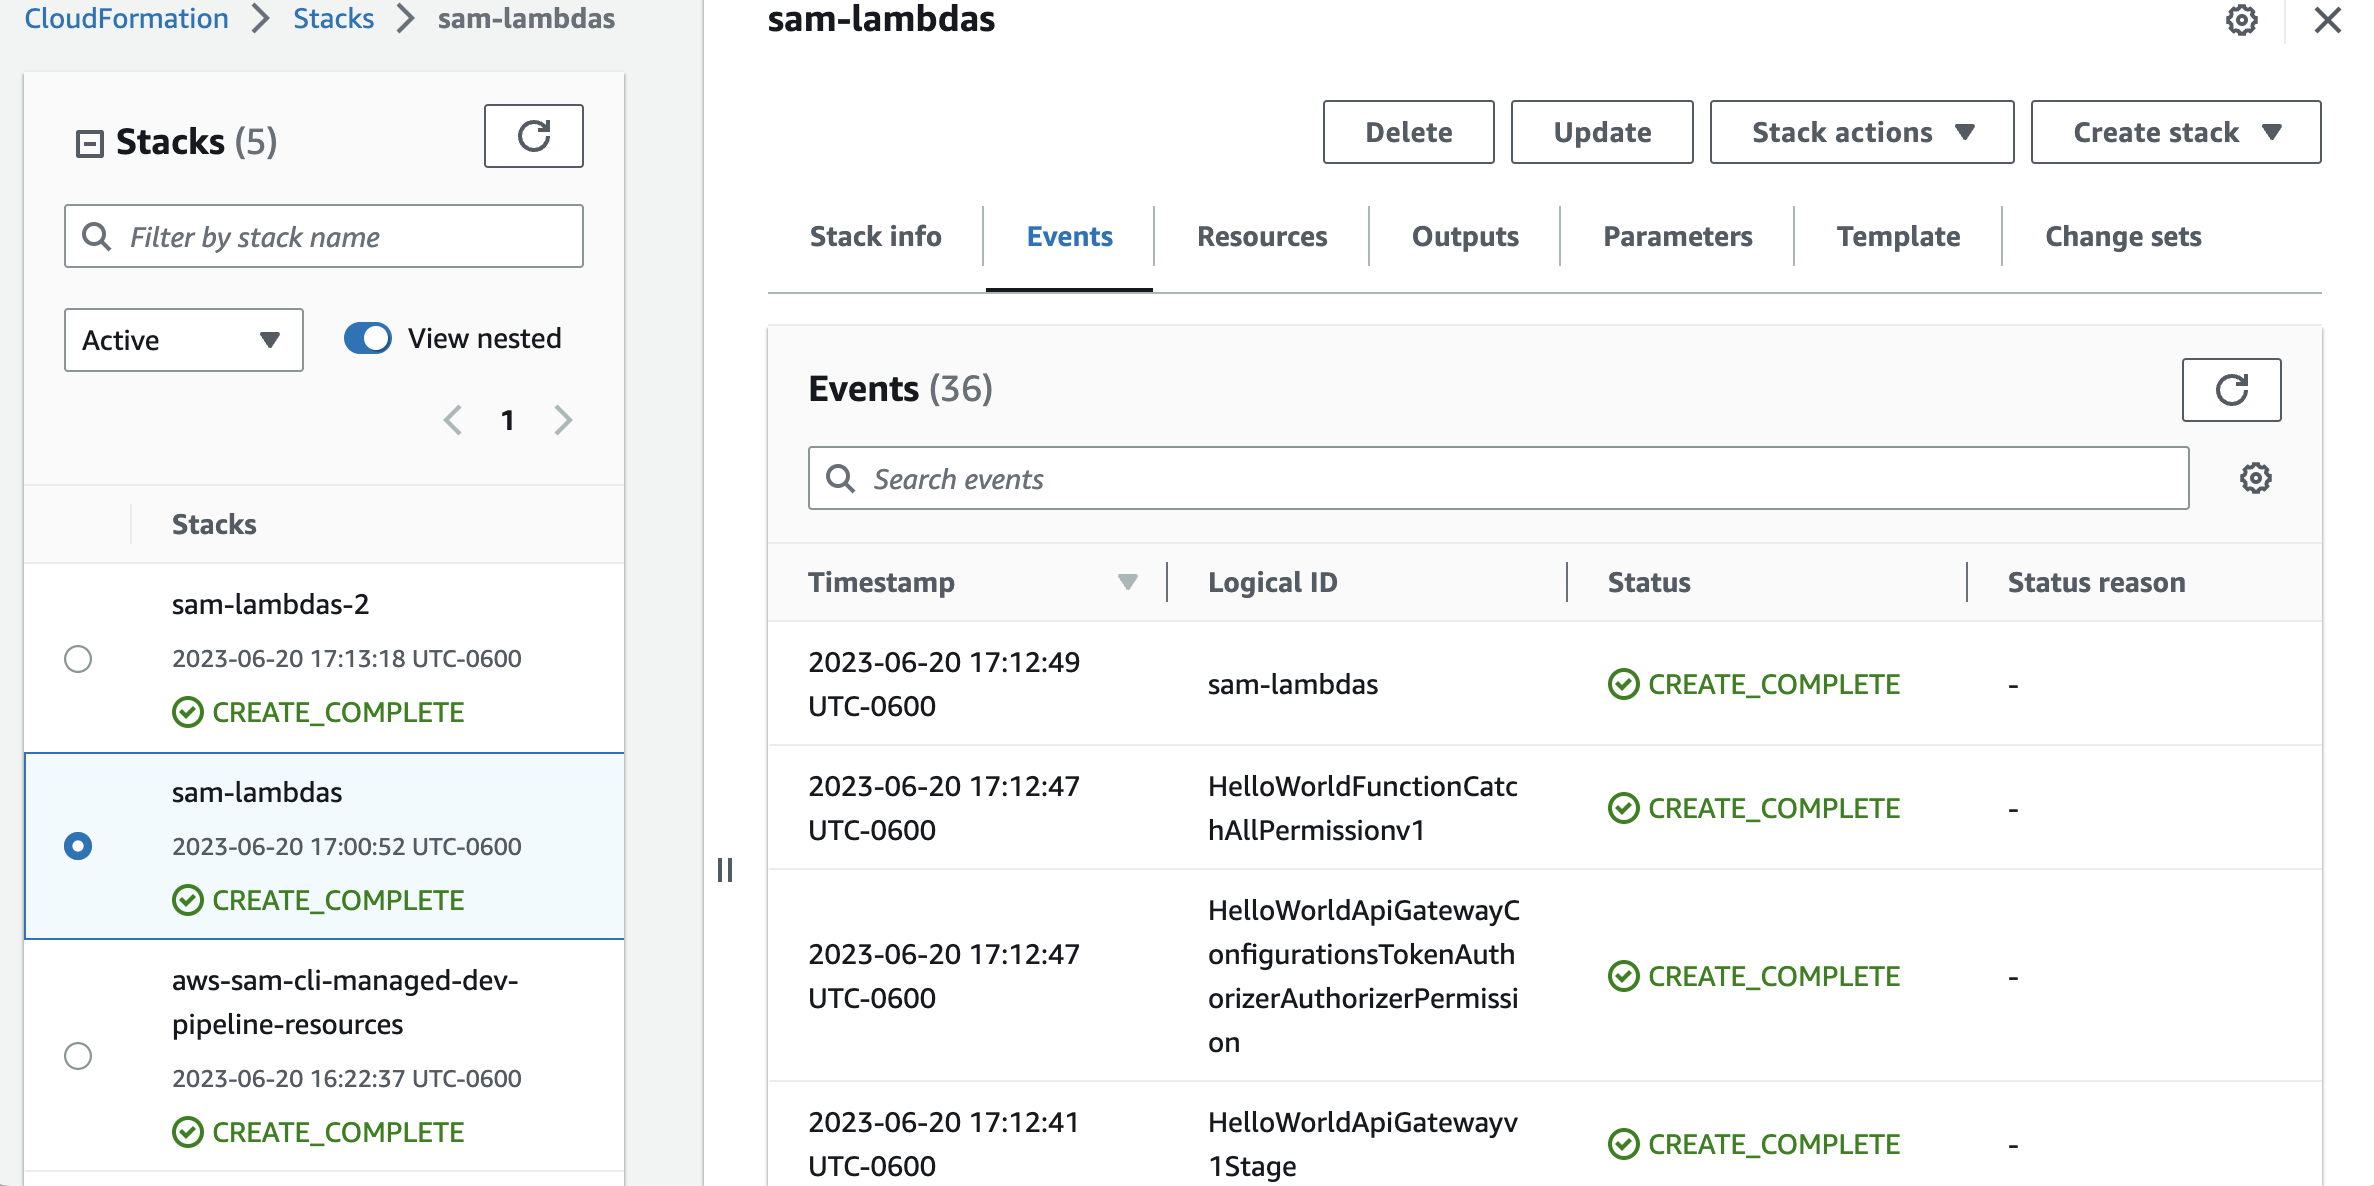
- A new CloudFormation stack with the resources required by SAM and GitHub Actions.
- An IAM role assumed by AWS CloudFormation when applying the changeset.
- An IAM role assumed by the GitHub workflow to deploy your artifacts.

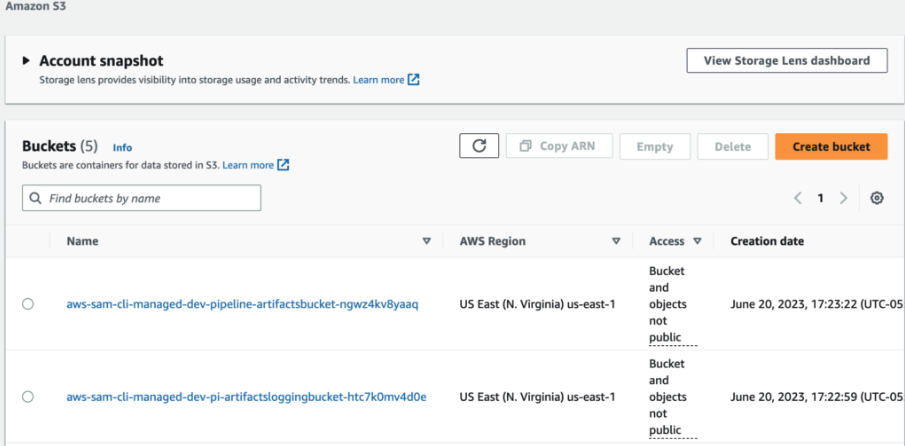
- A pair of S3 buckets used to upload your AWS CloudFormation template and store output logs.
- A new GitHub Workflow file that contains everything you need to run your deployment pipeline upon merging. Remember to add, commit, and push this file to your repository
If you are the owner of both the AWS account and the repository, and you have successfully completed the bootstrapping process, you’re all set! You can now create a new pull request to the specified Dev or Production environment branch, and the GitHub workflow will kick off.
You can monitor the deployment process either in the Actions tab of your GitHub repository or in the AWS console, specifically in the CloudFormation service panel.
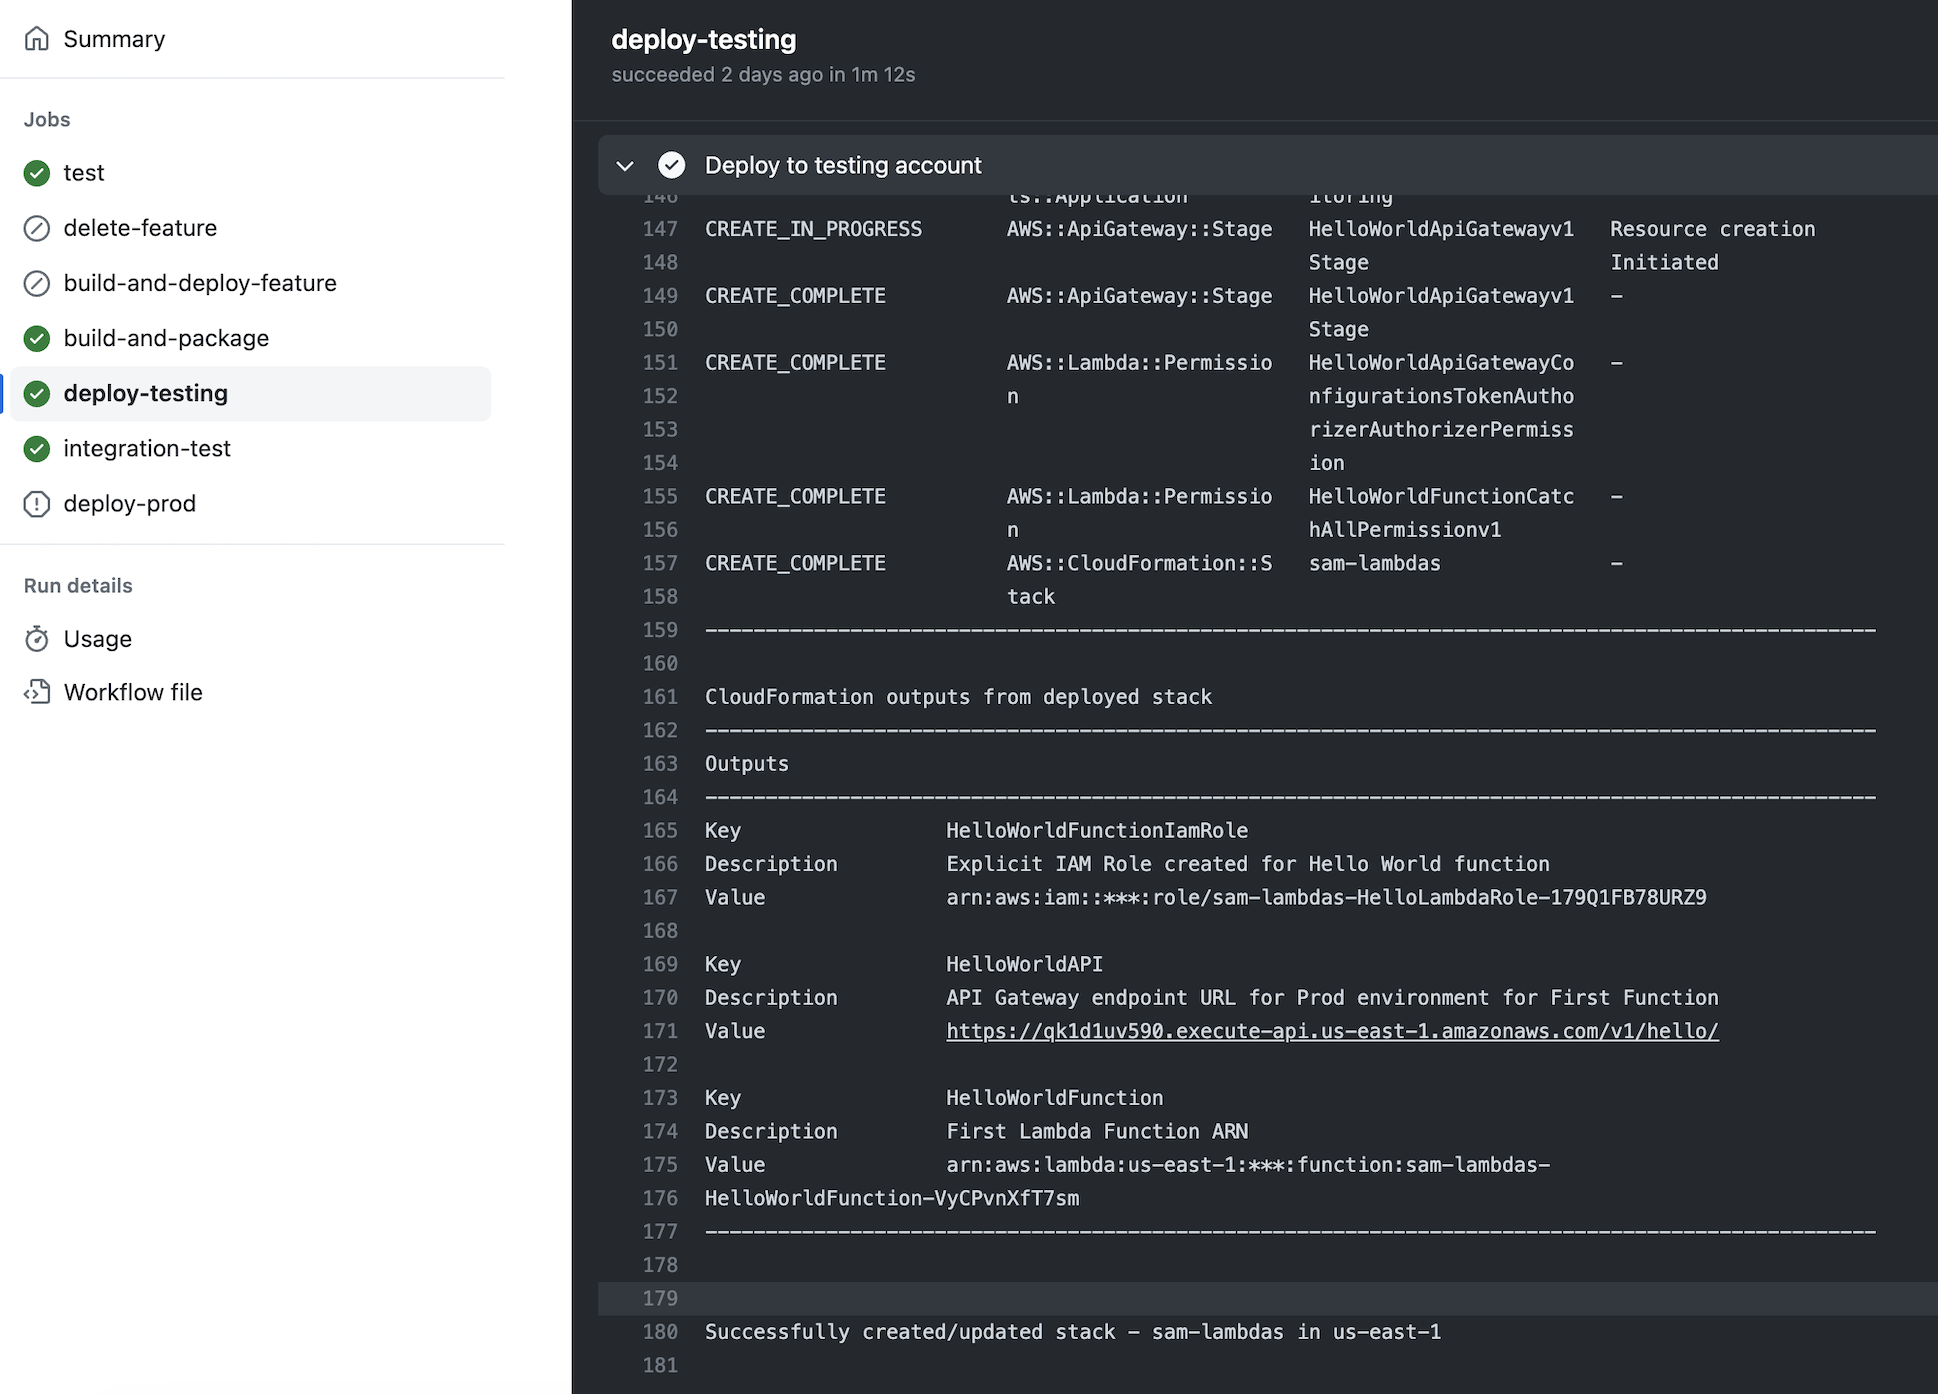
Note that in the logs displayed for the deployment job in GitHub, there is an Outputs section where you can find the API Gateway URL for the lambda function. Let’s give it a try!
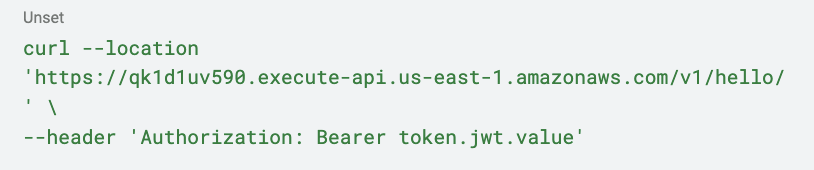
First, let’s check if the authorizer lambda is working correctly by making a request to our API without an Authorization header:
Request

Response
We should receive an HTTP status code 401 (Unauthorized).

Now, let’s add a JWT to our request:
Request
Response

And there you have it — we did it!
Setting Up GitHub Actions Workflow
GitHub Actions is a GitHub feature that allows us to automate our software development workflows within GitHub repositories. It can be used for CI/CD of code, as well as automating other software workflows.
To create and define a workflow, first create a YAML file (choose any name) in the .github/workflows/ folder of your repository. I’ll create the file .github/workflows/dev-deploy.yaml.
First, we specify the permissions we want to give to the GitHub workflow runner. These permissions modify the default permissions granted to the GITHUB_TOKEN, allowing us to add or remove access as required:

Next, we indicate the event that will trigger this workflow:
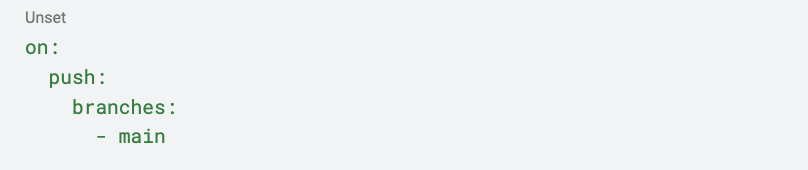
In this case, we’re telling the workflow runner to execute the workflow whenever there are new changes pushed to the main branch. You can utilize various events for different triggers.
Now, let’s move on to the main part of the workflow: the jobs. Each job runs in a runner environment specified by runs-on. A job consists of a sequence of tasks called steps. Steps can run commands, set up tasks, or execute an action within your repository, a public repository, or an action published in a Docker registry.
For more information about Jobs and Steps, you can refer to the official documentation site.
Now, let’s take a look at the job and steps we’ll be using to deploy our resources:
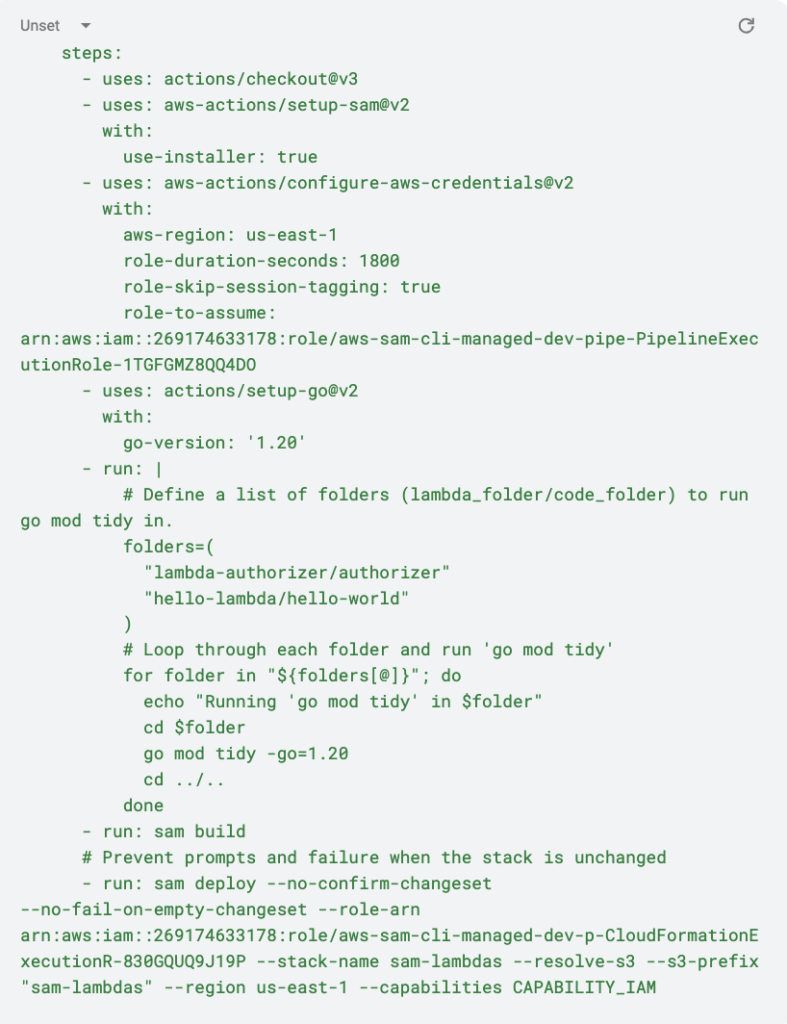
Here, we have only one step, but several things are happening. First, we are utilizing some existing GitHub Actions. The uses keyword is used to specify an action that should be executed as part of the workflow, and with: <parameters> is a set of key-value pairs where the key represents the input parameter name expected by the action, and the value represents the value you want to assign to that parameter. In this case, we are using actions to check out the code, install SAM CLI in the GitHub runner, and build and deploy our project.
Lastly, the run command is used to execute command-line programs using the operating system’s shell. As you can see here, we are running the go mod tidy command in each of our lambdas, ensuring that our project builds reliably and uses the correct versions of its dependencies.
You can learn more about these and other sam deploy options in the official documentation.
And that’s it! Once you have pushed your workflow file to your repository, you should see the workflow start. You can monitor its progress in the “Actions” tab of your repository. You can take a look at the repository with the full code here

Conclusion
We have covered a lot in this article! We explored the capabilities of AWS SAM templates for creating lambdas, implementing authorizer lambdas, defining AWS resources in a stack, deploying our stack, and setting up a CI/CD pipeline with GitHub workflows.
SAM templates are a powerful and efficient approach to developing serverless applications. When combined with GitHub workflows, we have a seamless CI/CD pipeline that automates our deployments and keeps our application updates flowing smoothly.
Our Expertise Powers Value-Adding Solutions
At Wizeline, we proudly implement cutting-edge technologies like AWS Lambda in our solutions for clients across industries. Our engineers have extensive experience with serverless stacks, allowing us to build and deploy applications that run reliably in the cloud without time-consuming server management or maintenance requirements. Learn more about how we partner with organizations to help them continue innovating and keep a competitive, modern edge.